Images: From R Markdown to HTML format
An Exploration
Introduction
This article is the first of a series of posts to investigate methods of inserting figures into different markdown formats. The resulting code depends on how images are included and the conversion tool they have to undergo. And — at least I think — also somewhat on the theme in use. In my case it is the blog widget of the starter-academic theme.
Here I look at the process chain from Rmd via Pandoc to HTML. I will inspect inserting images with the following methods:
- R chunk code via
knitr::include_graphics(). - ‘Insert Image’ window via blogdown Addins
- ‘Image …’ window vial Visual R Markdown
- Hugo shortcode
Of course, you can always include HTML instead of markdown code, but this case is not of interest here as there are no changes during the conversion process.
Using r chunk with knitr
You can include external images with the knitr function include_graphics(). There are many chunk options to specify the resulting figure, but not all are useful for external images.
- Use
out.widthandout.height(notfig.widthorfig.height, they are for R-generated plots) - Use
out.extrato add CSS styles (see for details Style your image environment with CSS) - If
fig.capis provided withoutfig.alt, it will also function as alternative text, which is usually not desired. - Use output hooks if you want even more control.
Example

Figure 1: Caption for figure 1
fig.align parameter generally works correctly, but not in this theme. It always centers to a 10 (instead 0f 12) column width. Left and right alignments do not work at all. I could not find and solve the problem.Code in R Chunk
```
{r img-with-knitr, echo=FALSE, fig.align='center', out.width='50%', fig.cap='Caption for figure 1', fig.alt='Alternative text for figure 1'}
knitr::include_graphics("images/my-image.png")
```
Code in HTML
```
<div class="figure" style="text-align: center"><span id="fig:img-with-knitr"></span>
    <img src="images/my-image.png" alt="Alternative text for figure 1" width="50%">
    <p class="caption">
        Figure 1: Caption for figure 1
    </p>
</div>
```
It is a stand-alone feature of knitr to provide automatically generated figure numbers that you can reference via their id. The id is generated from the chunk name with the pattern fig:<chunk name>. The figure 1 above can be referenced with \@ref(fig:img-with-knitr). Like this:
For more details see Figure 1.
knitr will not be aware of them.The relevant selectors for CSS styles are div.figure and p.caption. We will see that these styles are consistent with all the other methods provided by RStudio windows. But Hugo’s figure shortcode uses the HTML tags figure and figcaption. In the R Markdown Coobook is a work around expained how you can produce these Hugo HTML tags with knitr.
CSS
The CSS style I have used to display the image:
img {
        border: 1px;
        border-style: groove;
        box-shadow: 0 4px 8px 0 rgba(0, 0, 0, 0.2), 0 6px 20px  rgba(0, 0, 0, 0.19);
}

p.caption {
    text-align: center;
    margin-top: -0.5rem;
    margin-bottom: 0.5rem;
    font-size: smaller;
}
Summary
Using the knitr function include_graphics() for external images provides a rich set of image attributes (tags). It is also very flexible, especially if you are using the more complex possibilities like programming the output chunk hook.
- Caption: yes
- Format of caption: no
- Caption automatically numbered: yes
- Alt: yes
- Title: no
- Tooltip: no
- Width/Height: yes
- Link to: no
- ID: yes (format: “fig:<chunk name>)
- Classes: yes (with
out.extra, example:out.extra='class="border shadowed"' - CSS style: yes (with out.extra, example:
out.extra='style="background-color: #9ecff7; padding:10px; display: inline-block;"'See blog post Tips and tricks for working with images and figures in R Markdown documents - Other (key=value): no
Markdown via Addins ‘Insert Image’

The possibilities of RStudio Addins window for blogdown are sparse. But it has one big advantage: The addin helps user to provide the correct file path and copies the image to the right place.
The RStudio Addins window for blogdown package allows only width / height arguments and alternative text. The content of the ‘alt’-attribute is in the final HTML code converted to the caption, which is not correct:
The alternate text should describe what you can see on the image in case the image does not appear (e.g., is blocked) or the user applies a screen reader. ‘Alt’ text is also rendered by search engines. Every picture should have a corresponding ‘alt’ attribute The caption by contrast is not so important. It provides additional information and appears under the image explaining the content to reader who are able to see the picture.
Example
Figure 2: Caption for this figure 2
.Code in markdown
RStudio Addins window produces the following markdown code:
{width=100%}I think starting with the RStudio version 1.4 (January 2021) the RStudio Addin window is superseded by the the Visual R Markdown window (see next section). If you are turning on the visual editor you can always enhance the rudimentary markdown of the addin window with all the features of Visual R Markdown.
For this improvement you need to
- turn on Visual RStudio Markdown;
- select the image which markdown you want to enhance;
- click into the small round button with the three points to open up the dialog window;
- correct or add the desired content for the attributes (there is more under the “Attributes” tab);
- close the window;
If you want to work with markdown directly you may turn off Visual RStudio Markdown.

Screenshot of the Visual RStudio Markdown window
Code in HTML
Here I am referring to the RStudio Addin without enhancement from the Visual R Markdown window.
<div class="figure">
    <img src="images/my-image.png" alt="">
    <p class="caption"><strong>Figure 2:</strong> Caption for this figure 1
    </p>
</div>
As you can see: The alt attribute is empty, although I have filled it out!
alt (= capture) attributes then there is no div.figure and p.caption class. In this case there is only the img tag as you can see with the image under the header Markdown via Addins ‘Insert Image’.CSS
The conversion to HTML produced exactly the same classes as in the result with the knitr image inclusion (see the CSS code under the knitr section).
Summary
- Caption: yes
- Format of caption: yes
- Caption automatically numbered: no
- Alt: no
- Title: no
- Tooltip: no
- Width/Height: yes
- Link to: no
- ID: no
- Classes: no
- CSS style: no
- Other (key=value): no
Visual R Markdown via Menu ‘Insert …’

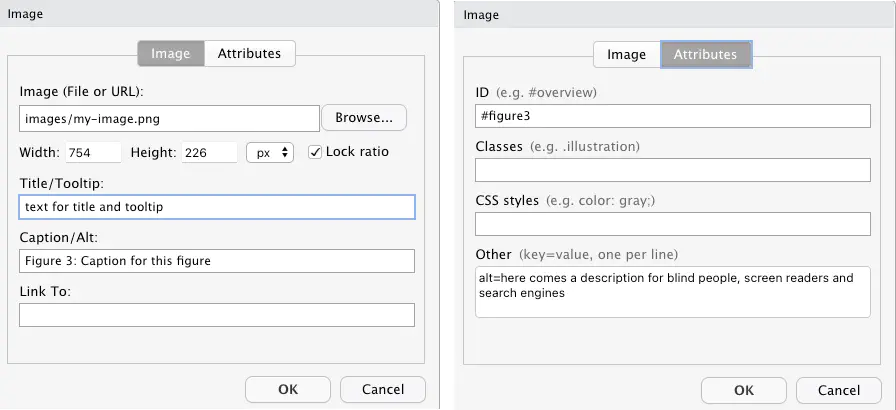
After you have turned on Visual R Markdown you can load the image window via the Menu 'Insert ' -> 'Image…' or shortcut ⇧⌘I. For an overview I put in the picture above both parts of the window side by side. You can see that it offers a very complete list of image attributes.
div.figure and p.caption classes will be produced and the appropriate CSS styles cannot be applied.Example
Figure 3: Caption for this figure
Even in this enhanced window is the wrong mixture of ‘Caption’ and ‘Alt’ attributes offered. But there is a work around with the ‘Other’-field as I have shown in the screenshot.
alt attribute in the field “Others”. After the conversion to HTML the former constitutes the caption and the later the alternative text.If you click on the inserted image and call the window again, then a slightly different window appears where fields for width and height are added and can be changed. This addition appears under the image as well by just clicking on the image.

Width and height field added after the image was included into the .Rmd page
Code in markdown
{#figure3 alt="here comes a description for blind people, screen readers and search engines}In addition to the standard markdown code all the other attributes are added inside curly brackets.
Code in HTML
<div class="figure">
    <img src="images/my-image.png" title="title text and tooltip" id="figure3"
    alt="here comes a description for blind people, screen readers and search engines">
    <p class="caption">
        Figure 3: Caption for this figure
    </p>
</div>
CSS
The conversion to HTML produced exactly the same classes as in the result with the other two methods knitr image inclusion and Addins ‘Insert Image’).
Summary
- Caption: yes
- Format of caption: no
- Caption automatically numbered: no
- Alt: no
- Title: yes
- Tooltip: yes
- Width/Height: yes
- Link to: yes
- ID: yes
- Classes: yes
- CSS style: yes
- Other (key=value): yes
Hugo figure shortcut
You cannot simply write {{< shortcode >}} in R Markdown, because Pandoc is not aware of Hugo shortcodes, and may convert special characters so that Hugo can no longer recognize the shortcodes (e.g. < will be converted to <).1
With Blackfriday as default Markdown rendering engine I used to use for shortcodes the blogdown::shortcode() function. But after Hugo v0.60 the default Markdown rendering engine changed to Goldmark. In the above quoted man page for the shortcode() function there is a also special note on this issue:
Since Hugo v0.60, Hugo has switched its default Markdown rendering engine to Goldmark. One consequence is that shortcodes may fail to render. You may enable the unsafe option in the configuration file: https://gohugo.io/getting-started/configuration-markup/#goldmark.
I couldn’t understand this remark as for me all the Hugo shortcodes works well. But to apply it more easily I use pure HTML code chunks to prevent a conversion by Pandoc. This has the advantage that I can include Hugo’s shortcode syntax without any changes.
Example

Code in HTML chunk
```{=html}
{{< figure src="images/my-image.png" class="center" alt="My alt text" caption="My title text" id="shortcut-figure" numbered="true" >}}
```
The id and numbered attributes are not provided by but they are a feature from the academic theme.
- If you do not use
idexplicitly then Hugo generates an ID with the “figure-” followed by the caption text (e.g.,id="figure-my-caption-text"). - You can see that the numbering systems starts from scratch, e.g., it does not account for the
knitrchunks. The same is true vice versa. - Besides the already mentioned attributes Hugo also features
target,reland attribution (attr= text;attrlink= link).
CSS
```{=html}
<figure id="figure-shortcut-figure">
<div class="d-flex justify-content-center">
<div class="w-100">
<img alt="My alt text" srcset="
/post/images-from-rmd-to-html-format/images/my-image_huf81a7faf920bb11d47d82b059b9dc0cf_20503_1061e20606536f4413fb34665581822b.png 400w,
/post/images-from-rmd-to-html-format/images/my-image_huf81a7faf920bb11d47d82b059b9dc0cf_20503_c4c18b47561549b1147ccf6dd152b5f0.png 760w,
/post/images-from-rmd-to-html-format/images/my-image_huf81a7faf920bb11d47d82b059b9dc0cf_20503_1200x1200_fit_lanczos_2.png 1200w" src="/post/images-from-rmd-to-html-format/images/my-image_huf81a7faf920bb11d47d82b059b9dc0cf_20503_1061e20606536f4413fb34665581822b.png" width="754" height="226" loading="lazy" data-zoomable="" class="medium-zoom-image"></div>
</div>
<figcaption data-pre="Figure " data-post=": " class="numbered">
My caption text
</figcaption>
</figure>
```The produced HTML is pretty complex, but here we are just interested in the two relevant tags for CSS styling: <figure> and <figcaption>. These two HTML tag are different to the code produced by other methods of inserting images. So maybe it would be a good idea to style both variants the same way.
Summary
- Caption: yes
- Format of caption: no
- Caption automatically numbered: yes (Academic theme)
- Alt: yes
- Title: no
- Tooltip: no (zoomable)
- Width/Height: yes
- Link to: yes
- ID: yes (Academic theme)
- Classes: yes
- CSS style: yes
- Other (key=value): no
Results and Conclusion
| Attribute | knitr | Addin | Visual | Hugo | Remark |
|---|---|---|---|---|---|
| Caption | ✅ | ✅ | ✅ | | ✅ | | |
| C. format | ❌ 2 | ✅ | ❌ | | ❌ ^ | 2^ | 2 standard = bold |
| C.numbered | ✅ | ❌ | ❌ | | ✅ ^ | 3^ | 3 via ‘Academic’ theme |
| Alt | ✅ | ❌ | ✅ 4 | | ✅ | | 4 via ‘Other’-field |
| Title | ❌ | ❌ | ✅ | | ❌ | | |
| Tooltip | ❌ | ❌ | ✅ | | ❌ | | |
| Width/Height | ✅ | ✅ | ✅ | | ✅ | | |
| Link to | ❌ | ❌ | ✅ | | ✅ | | |
| ID | ✅ 5 | ❌ | ✅ | | ✅ ^ | 6^ | 5 6 |
| CSS | ✅ | ❌ | ✅ | | ✅ | | |
| Other | ❌1 | ❌ | ✅ 7 | | ✅ ^ | 8^ | 1via output chunk arbitrary HTML code! 7 free choice! 8 |
If we take into account that code produced by the RStudio Addin window can be improved at any time with the Visual R Markdown window then all the four offered methods are pretty similar. But keep in mind that advantages on the one hand are often counter acted by disadvantages on other areas. So — for instance — provides the conversion via Pandoc many advantages but looses also some features of Hugo or the applied theme.
To sum up this this little investigation I see three patterns of decisions criteria:
- One big difference is the possibility to number the figures automatically. The Addin and Visual R Markdown windows do not provide this feature.
- On the other hand filling in the window fields is — especially for people who are not so comfortable with HTML or Markdown code — easier.
- Another decision criteria could be consistency: If you are using R chunks (which is the major reason to use the .Rmd format!) and want to be consistent throughout the file, then the decision for the
knitrmethod is obvious.
But let’s see what the other file format are producing. For people using different methods2 for their posts perhaps the comparison inside one file format is not sufficient. Perhaps there is a method not ideal when considered only one file format but has a higher consistency when looked all file format together.
Helper functions to write Hugo shortcodes using the R syntax↩︎
As with blogdown version 1.3 not all files are automatically rendered, one could choose a different file and conversion format for every post separately. This requires (1) deleting those files produced by the conversion process in the folder of the post under consideration (2) renaming the file ending of the main file and kniting/rendering the new file format again.↩︎
Peter Baumgartner
Retired Professor of Technology Enhanced Learning (TEL)
My research interests include eLearning, educational technology, educational design, open science and data science education.